

Attention Salesforce and AWS users! Struggling to juggle customer service between Salesforce and AWS Agent Workspace? You’re not alone.
In this blog post, we explore an innovative integration between these systems. Imagine AWS call flows seamlessly connected with Salesforce, delivering all essential customer information directly to your AWS dashboard. Sounds incredible, right? Discover how this integration revolutionizes your workflow, boosts productivity, and ensures a satisfying experience for your clients!
Now, let’s dive into the requirements for this game-changing integration.
- AWS: AWS Account, AWS Connect, AWS Lambda Function, AWS Dynamo DB, AWS Event Bridge, AWS App Flow, AWS KMS
- Salesforce: Salesforce Account, Salesforce Contact and Case
- Programming Language: JavaScript
Contents :
What is Salesforce?
Salesforce is a robust CRM software that acts as a centralized hub for handling customer accounts, sales leads, activities, and customer care issues, among other services.
Using Salesforce for Case Management
In this connection, Salesforce is mostly used for case management. A case includes a client’s question, comment, or concern, and serves as a critical point at which support personnel may examine and solve customer needs to provide greater service.
Setting up Salesforce
To easily interconnect AWS and Salesforce platforms, build a Salesforce developer account and a connection app. The technique is much more straightforward than you would imagine!
Step 1: Get Your Free Salesforce Developer Account
- Go to Developer Salesforce and start the enrolment procedure.
- Fill in the relevant sections with your basic information, such as name, email address, and chosen username.
- Accept the terms and conditions and await Salesforce’s confirmation email.
Step 2: Verifying Your Account and Getting the URL
- Keep an eye in your inbox for a verification email from Salesforce.
- Click the verification link to activate your developer account.
- Make a note of the instance URL supplied in the email, as it will be required to configure the connection app.
Step 3: Creating Your Connection App – Bridging the Gap
- With your developer account activated, create a connection app.
- This app serves as a gateway, allowing interactions between your integration and Salesforce data.
This setup serves as the foundation for Salesforce and AWS’s smooth connectivity, allowing you to easily manage client contacts and streamline corporate operations.
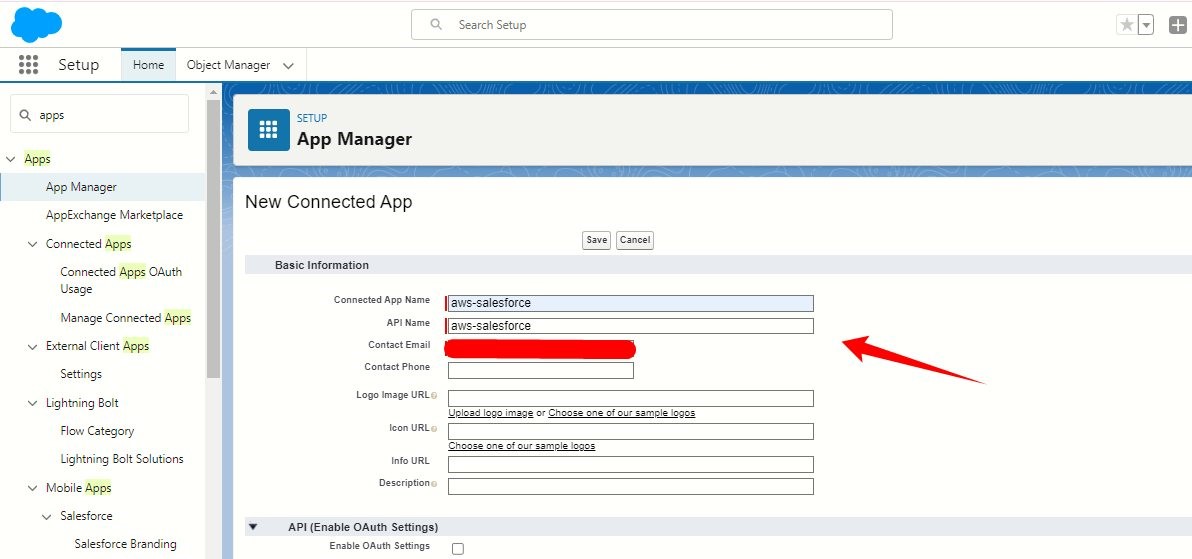
- Setup: Locate the gear icon on the Salesforce page. Click on the setup for the current app.
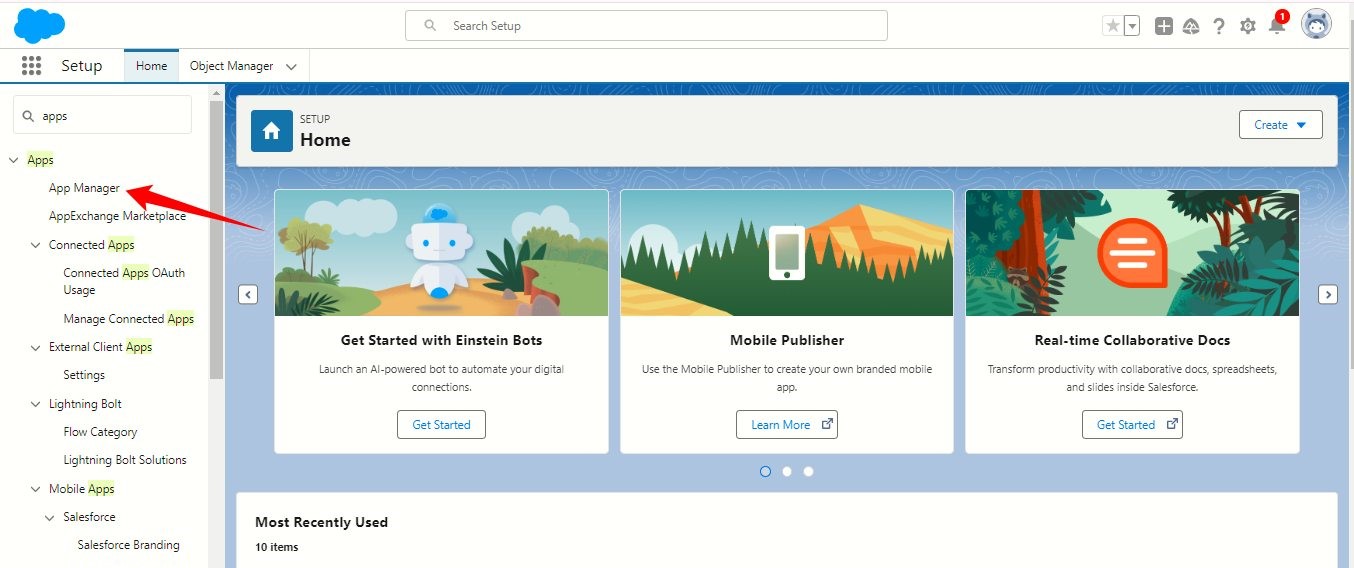
- Connected APP: In the Quick Find box, type Apps. Then select Manage Connected Apps.
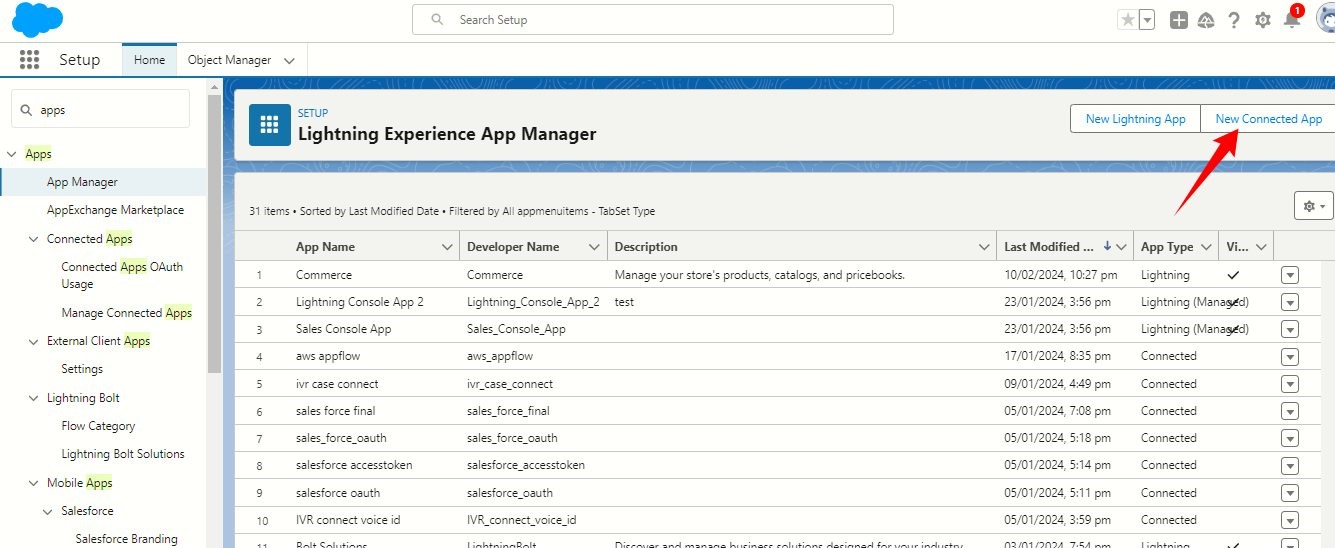
- Create Connected APP: To create a linked app, click on New Connected App.
- Fill in the details: Enter the necessary information [Connected App Name, API Name, and Contact Email].
- OAuth: Enable OAuth Settings
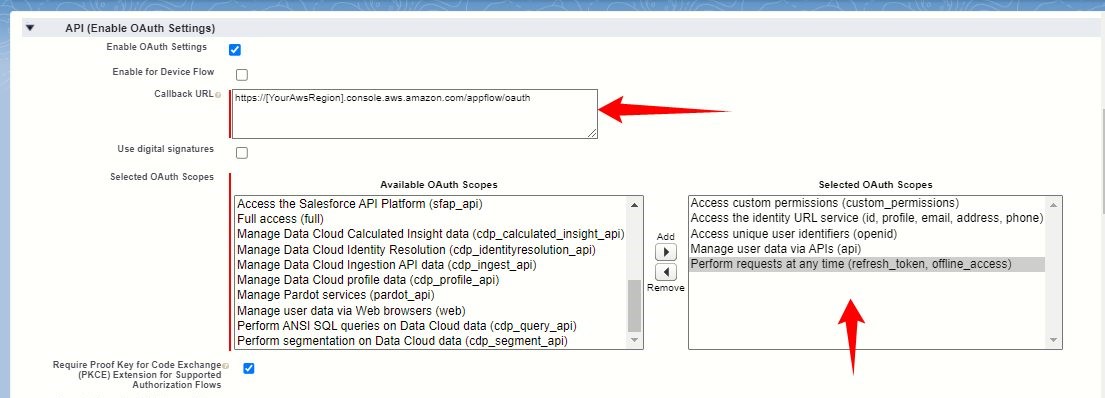
Enter the call back URL as, https://[YourAwsRegion].console.aws.amazon.com/appflow/oauth https://[YourAwsRegion].console.aws.amazon.com/appflow/oauth
OAuth Scope’s
- Save the Application.
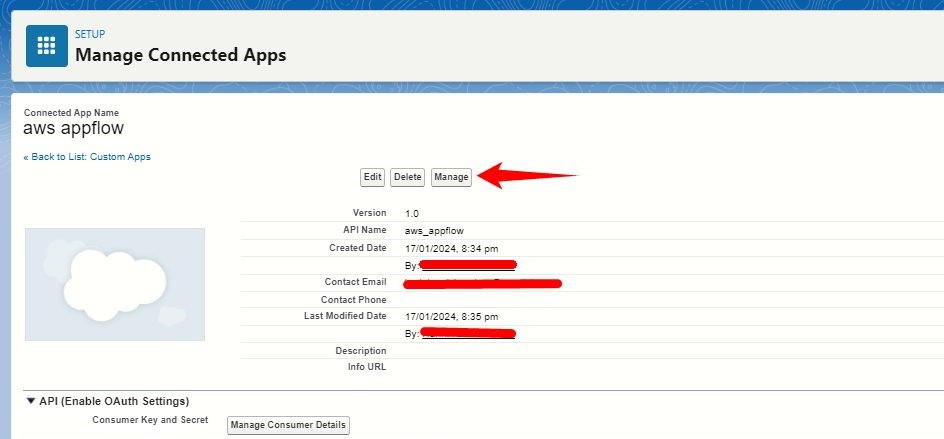
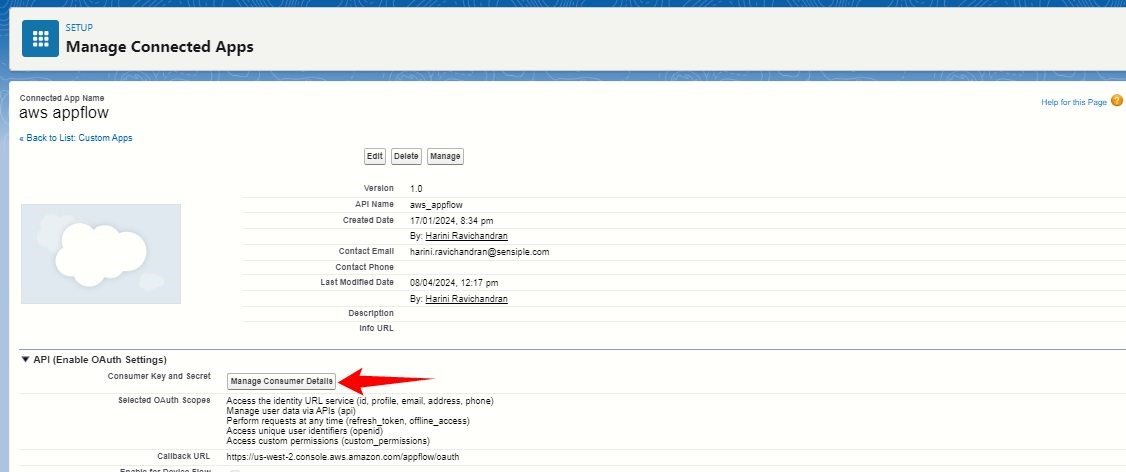
- Manage APP: After creating the connection app, select Manage to set settings.
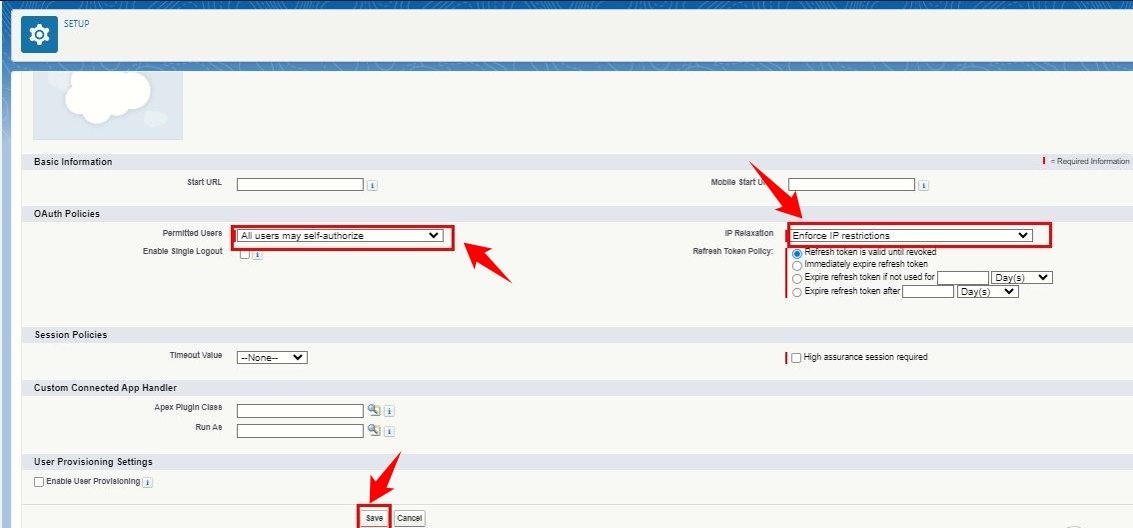
- Configuration: Ensure that the allowed users are “All users may self-authorize”, and IP Relaxation is “Enforces IP restrictions”.
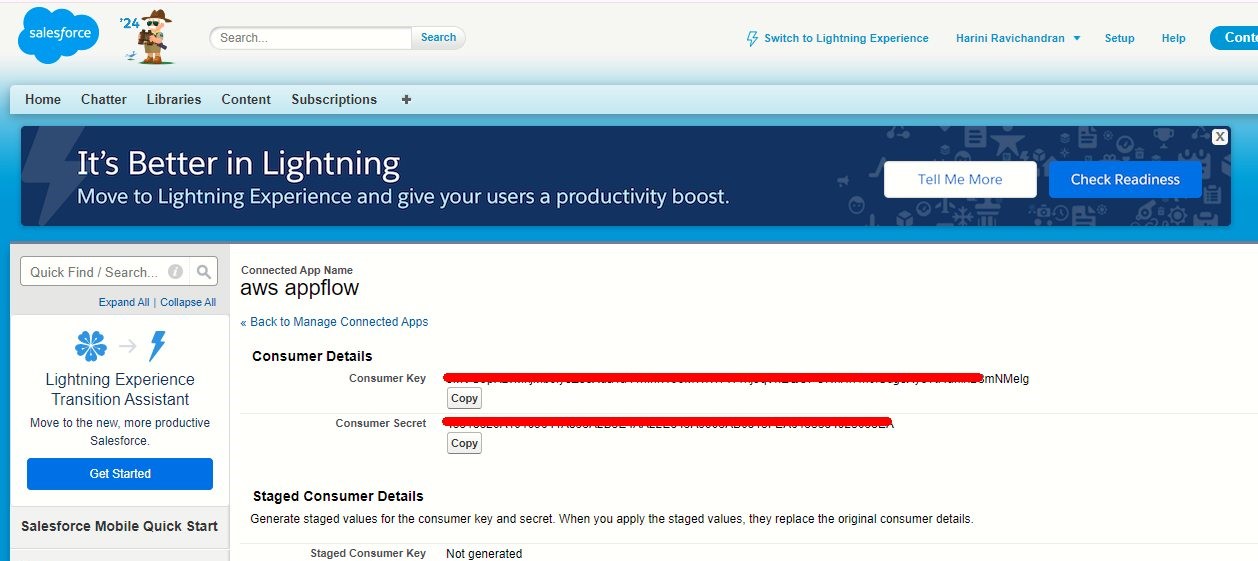
- Access and Secret Key: To obtain the access and Secret Key, go to the linked App flow page and click Manage consumer data.
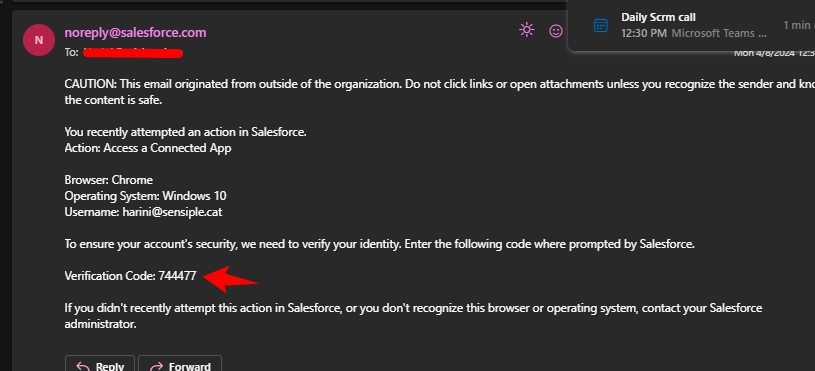
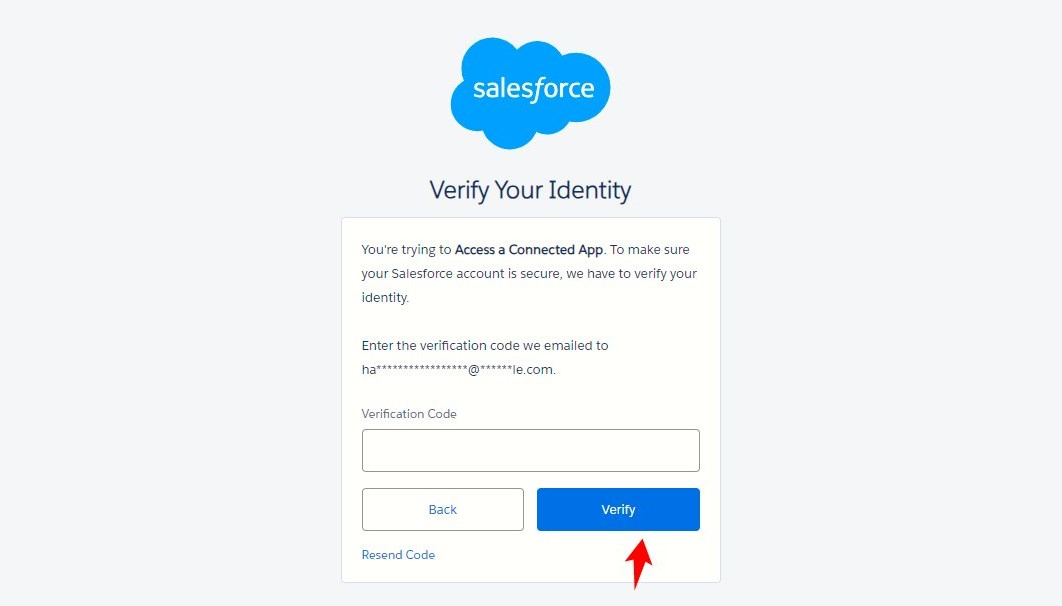
- Verification: You will receive the OTP via email. Please enter OTP to receive the access and secret keys.
- Once the OTP is verified, the below screen will be displayed.
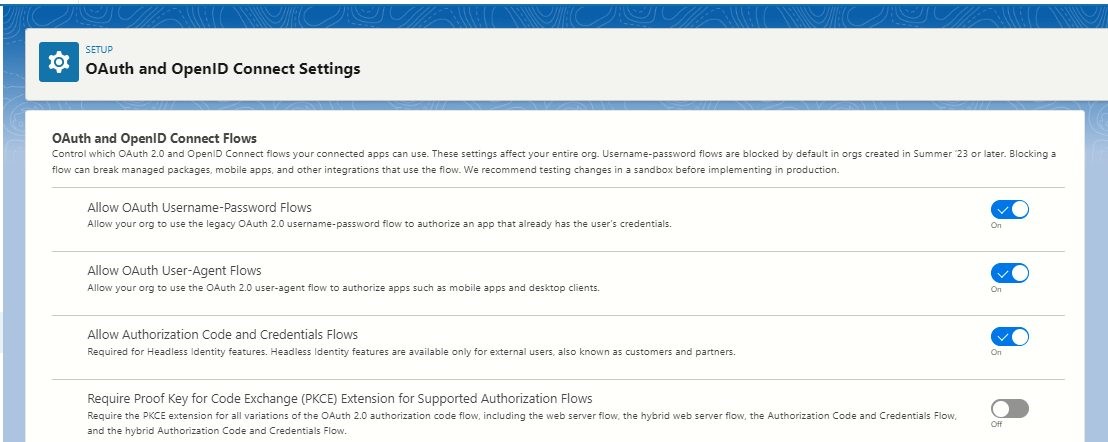
- Your connection app is now ready. Before using your key, configure your OAuth settings.
Please put Identity into the Quick Find search box. You may view the OAuth and OpenID Connect settings. - This setup allows you to generate an OAuth key. Generate an OAuth key using the Salesforce API. This OAuth key is required to create a case in Salesforce.

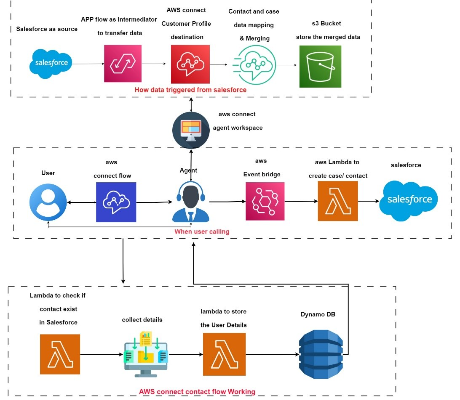
Welcome to the world of AWS Connect, where crafting seamless contact flows is as simple as drag-and-drop! If you’re ready to revolutionize your customer interactions, you’ve come to the right place.
AWS Connect, you wield the power to tailor customized contact flows to suit your unique requirements. Say goodbye to complex setups and laborious configurations. With just a few clicks, you can design a flow that perfectly aligns with your needs.
But before diving into creating your flow, there are some essential steps to complete. This includes creating Lambda functions to handle conditions during calls, such as verifying contact existence in Salesforce. Additionally, setting up a Lex Bot enables capturing voice inputs from users, which is essential for personalizing the call flow experience, like retrieving usernames.
Let’s embark on this journey to streamline customer interactions and elevate your business’s customer service experience with AWS Connect!
1. First, write a lambda function to check if the contact exists in Salesforce.
- To verify if a contact exists, use the Salesforce API. First, obtain an access token. Pass the credentials we received while establishing the Salesforce account.
          const SalesforceloginURL = 'https://login.salesforce.com/services/oauth2/token';

          const password = process.env.PASSWORD;

          const clientId = process.env.CLIENT_ID;

          const clientSecret = process.env.CLIENT_SECRET;

          const username = process.env.USER_NAME;

          const response = await axios.post(

              `${SalesforceloginURL}?grant_type=password&client_id=${clientId}&client_secret=${clientSecret}&username=${username}&password=${password}`,

              {

                  headers: {

                      'Content-Type': 'application/x-www-form-urlencoded',

                  },

              }

          );

          const accessToken = response.data.access_token;

          return accessToken;
2. Now use this Access key to check the contact.
          const config = {

              method: 'get',

              url: `https://sensiplesoftwaresolutions2-dev-ed.develop.my.salesforce.com//services/data/v53.0/query/?q=SELECT+Id,Phone,Name+FROM+Contact+WHERE+Phone='${phonenumber}'`,

              headers: {

                  'Authorization': `Bearer ${auth}`,

              }

          };

          const response = await axios(config);

          console.log('check contact response:', response.data);
3. Implement these codes in lambda function to check the contact.
4. Now, create another lambda function to store the user inputs on Dynamo DB.
              import { DynamoDBClient } from "@aws-sdk/client-dynamodb";

              import { PutCommand, DynamoDBDocumentClient } from "@aws-sdk/lib-dynamodb";

              const client = new DynamoDBClient({});

              const docClient = DynamoDBDocumentClient.from(client);

              export const handler = async (event) => {

                  const { subject, firstName } = event.Details.Parameters;

                  const contact = event.Details.ContactData.CustomerEndpoint.Address;

                  const contactId = event.Details.ContactData.ContactId;

                  console.log('contact id:', contactId)

                  const phone = contact.slice(2)

                  const timeNow = new Date().toISOString()

                  const command = new PutCommand({

                      TableName: "ivr-accfab-storeCustomerData",

                      Item: {

                          phonenumber: phone,

                          contactId: contactId,

                          subject: subject,

                          username: firstName,

                          created_at: timeNow,

                      },

                  });

                  const response = await docClient.send(command);

                  console.log('Data added successfully', response);

                  return { statusCode: 200 };

              }
- We get user inputs such as their name, date of birth, and SSN. In addition, the caller ID and produced timestamps must be stored in the Dynamo database. The code below initiates this action using JavaScript.
5. Create another lambda function to create contact & case on Salesforce.
                  const auth = await authentication();

                  const body = {

                      "FirstName": // firstname get from user,

                      "LastName": // last name get from user,

                      "Phone":// phone number get from event,

                  };


                  const config = {

                      url: salesforceCreateContact,

                      method: 'post',

                      headers: {

                          'Authorization': `Bearer ${auth}`,

                          'Content-Type': 'application/json',

                      },

                      data: body,

                  };

                  const response = await axios(config);

                  const contactId = response.data.id;
- As shown above, utilize the same feature to produce an access token. After establishing the access token, we must construct the contact if it does not exit.
6. Create Salesforce Case.
                  const auth = await authentication();

                  const caseData = {

                      "ContactId": Id,

                      "SuppliedName": Name,

                      "SuppliedPhone": Phone, // Assuming SuppliedPhone should be the contact ID

                      "Type": "IVR",

                      "Status": "new",

                      "Reason": subject,

                      "Origin": "Phone",

                      "Subject": subject,

                      "Description": `A new case has been opened with a status of "New." The reason for the case is ${subject}. The user associated with the case is identified as ${Phone}. This case is categorized with a high priority level, denoted as P1.`,

                      "Priority": "P1- High",

                  };


                  const response = await axios.post(

                      salesforceCreateCaseURL,

                      caseData,

                      {

                          headers: {

                              'Content-Type': 'application/json', 'Authorization': `Bearer ${auth}`,

                          },

                      }

                  );

                  console.log('Case created:', response.data);

                  return response.data;
- The Contact ID will be returned after the contact is formed, and you may use the contact number to retrieve it via the Salesforce GET API, as we did previously to check the contact.
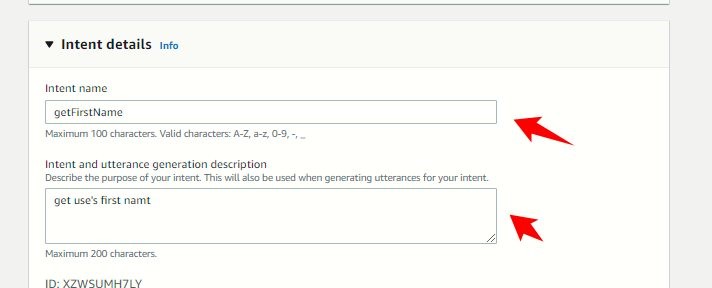
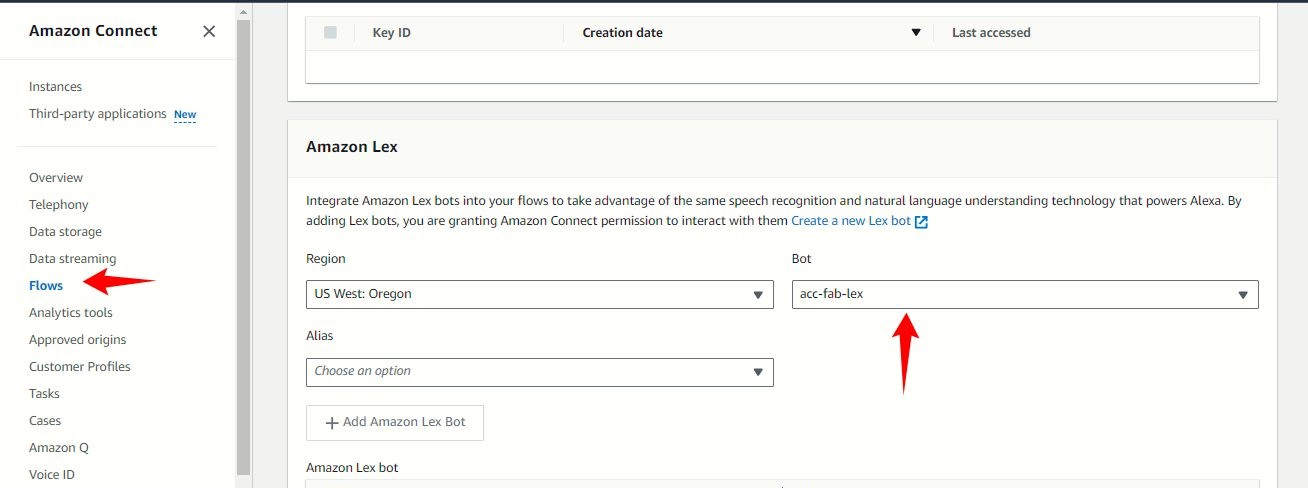
7. Now create amazon Lex bot to get the username as input.
- Go to the Amazon Lex service. Click on Create Bot.
- Click on Intents. Then click the Add Intents button. Now, in the text areas, put the intended name and description.
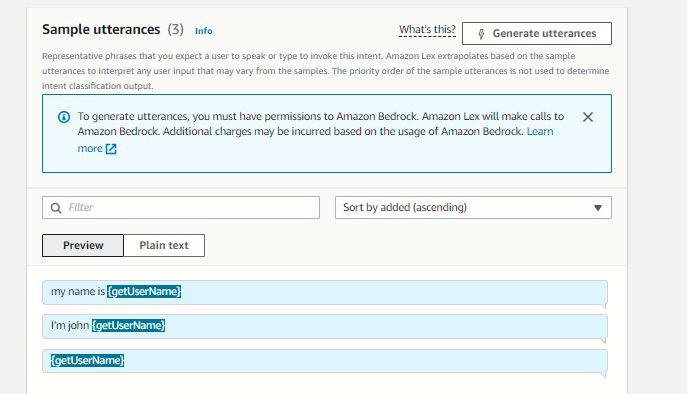
- Fill out example utterances to see how consumers will respond.
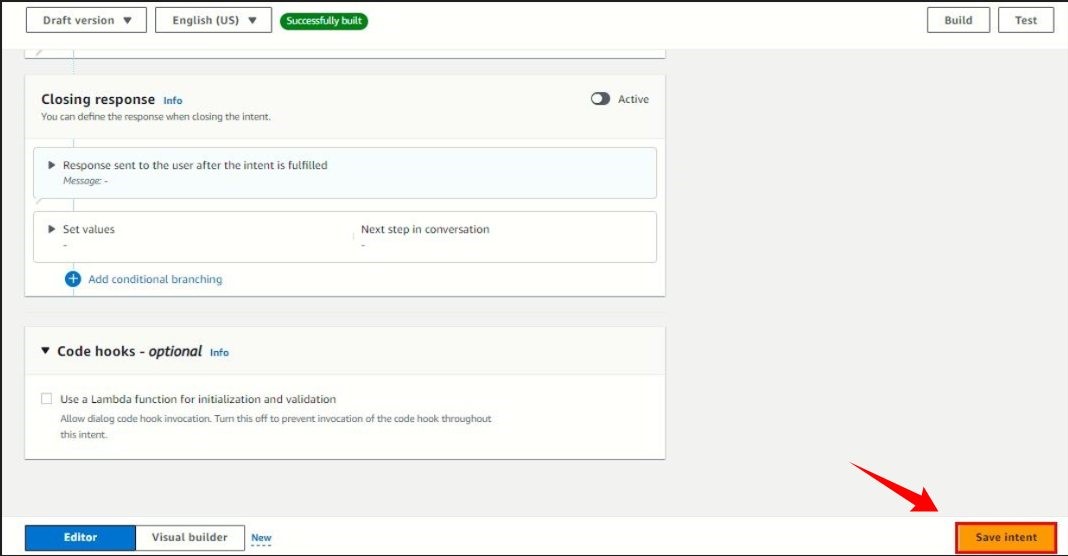
- Now, add the initial answer and slots. In slots, you may add any condition that you wish to do, such as adding regex to ensure that all inputs are numeric.
- Finally, save the intent and test it.
- Once the lambda and Lex bots have been generated, make them available for usage in the AWS Connect flow. Now, on your instance page, click on flow in the left bar and add the Amazon Lex and Lambda functions.


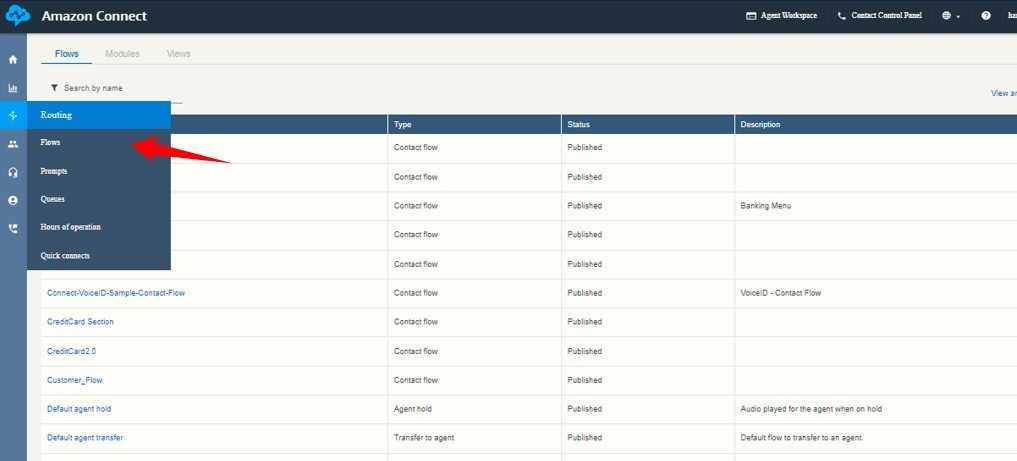
8. Now move to Contact Flow Creation part.
- Sign in to your AWS Connect account and choose or create your instance. After you’ve logged in, you can begin the exciting part: customising your contact flow.
- Navigate to the “Flows” tab for a simple UI.
- Hit the “Create flow” button.

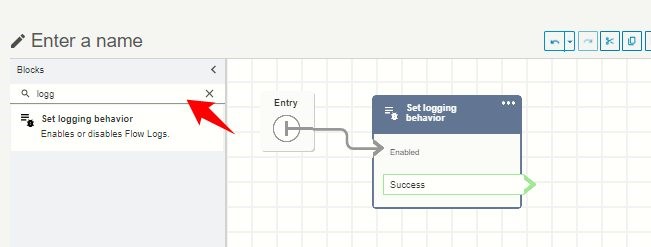
Now comes the fun part! Drag and drop blocks from the sidebar onto the design canvas to create your flow. Need to route calls? Not an issue. Want to collect client information? Easy breezy. The power is in your hands.
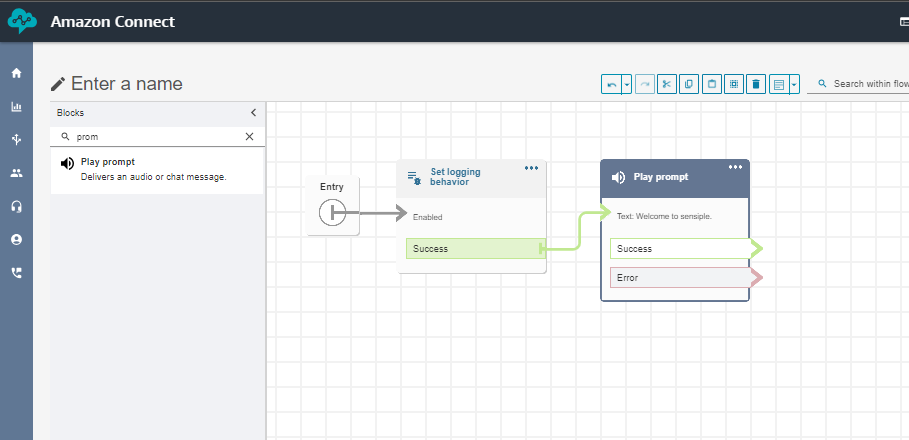
- First and foremost, always enable logging to record call flow logs. Your logs will be stored in AWS CloudWatch.
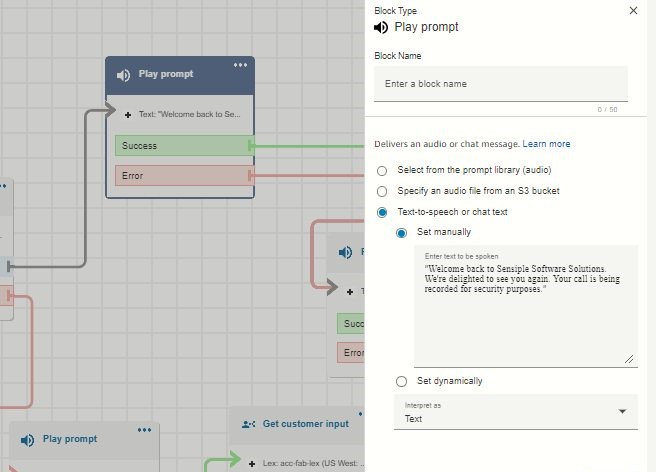
- Add Prompt widget to invite the customer.
- Verify the incoming contact number.
The Invoke Lambda function determines if an incoming contact number is already registered or is a new addition. In circumstances where the contact number is registered, we bypass the authentication process entirely, recognising the caller’s familiarity.
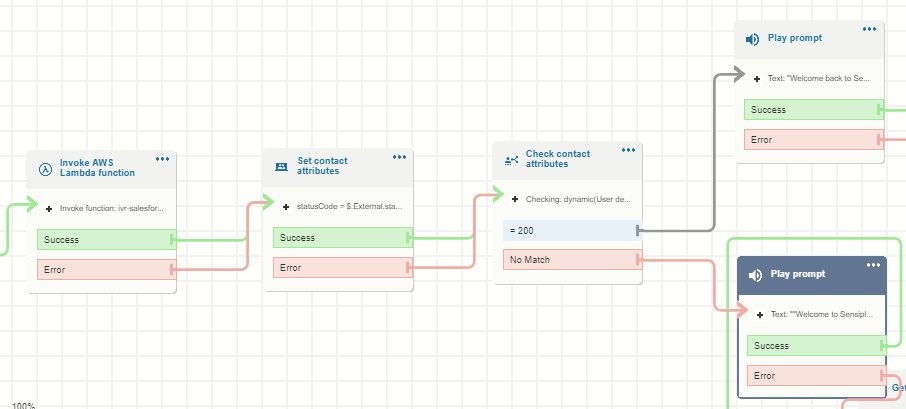
But wait—there’s more! We have a flawless two-step authentication process in place for those new numbers. First, we verify the Social Security Number (SSN) supplied by the caller. Once that’s approved, we quickly proceed to check the Date of Birth.
In the field of contact management, efficiency and security are critical. After successfully completing the Social Security Number (SSN) and Date of Birth verification processes, which authenticate the caller’s legitimacy, the conversation effortlessly transitions to addressing their specific requirements or queries.
Now save the inputs to an AWS Dynamo DB. It will make it easier to establish contact and case data on Salesforce. Now it’s time to run the lambda code to save the data to Dynamo DB.
Connect the User with Queue
Implementing a complex queuing system is a critical step in optimizing customer service for unique user demands. When clients provide the reason for their call, the information is utilized to categorize and organize incoming requests into separate queues.
- Each queue is intelligently linked to a group of specialized agents with the necessary knowledge to handle questions in that category.
- Then, verify the staffing availability; if the agent is not available, redirect to another path. After that, utilize the Transfer to Queue widget to connect with the agent.
- Finally, disconnect the flow.
- Now create the Event bridge to trigger a lambda function to create case and contact on Salesforce.

We’ve covered setting up your contact flow and integrating with Salesforce. But the magic does not end there!
Let’s look at how AWS Event Bridge can automate actions once your agents and clients disconnect calls.
Consider EventBridge to be the core nervous system for your AWS services. It enables you to design rules that will execute specified actions when certain circumstances occur. In our example, the event will be triggered by a call disconnect within your agent or user.
Here’s how we will use EventBridge in our Salesforce integration:
EventBridge Rule Creation: We’ll create a rule in EventBridge that listens for the “call disconnect” event in your AWS Connect contact flow.
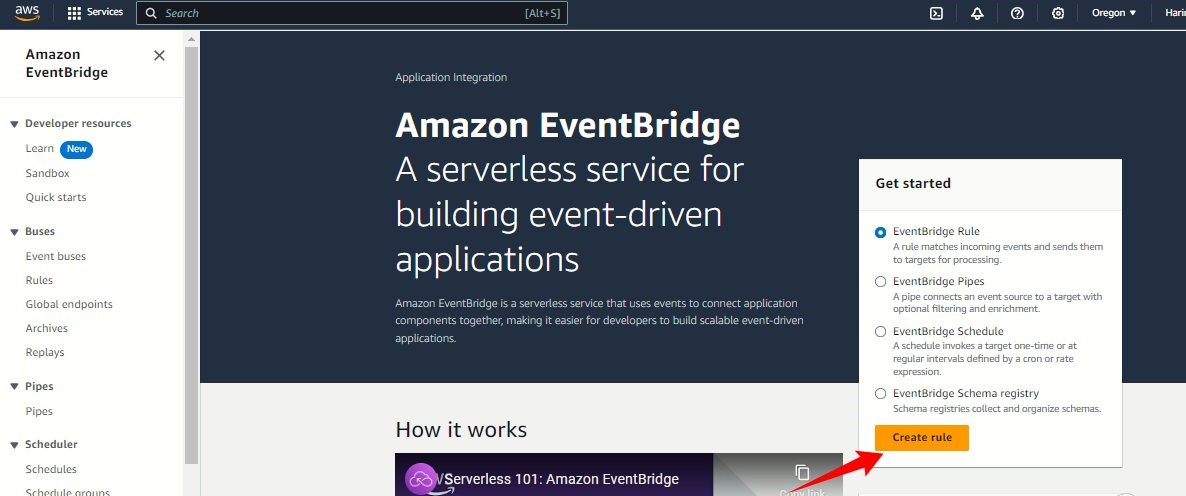
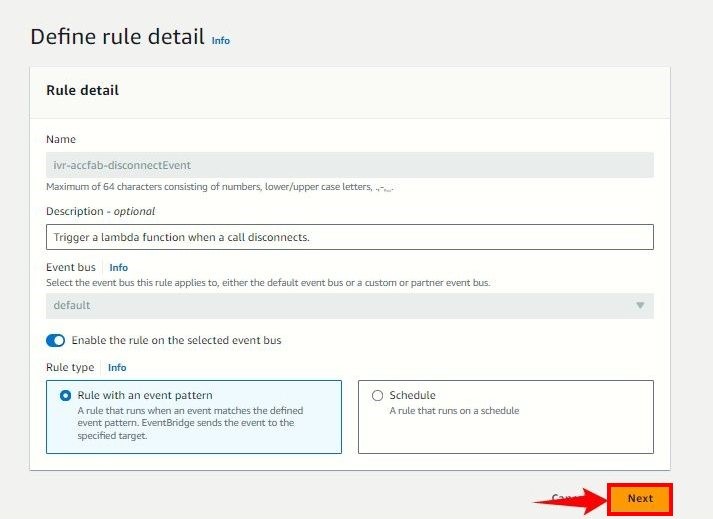
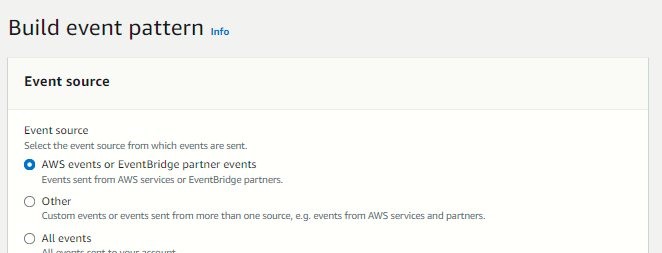
- First go to the Amazon Event Bridge and click the Create Rule button.
- Fill the required fields and click on “Next”.
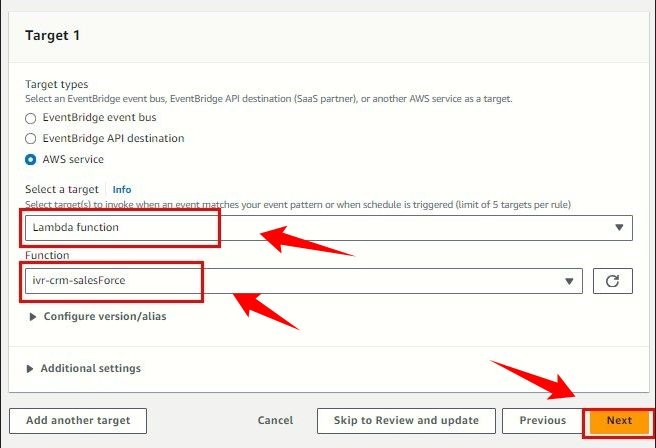
- Now set the target function. Here we will be setting lambda function as a target.
Case Domain
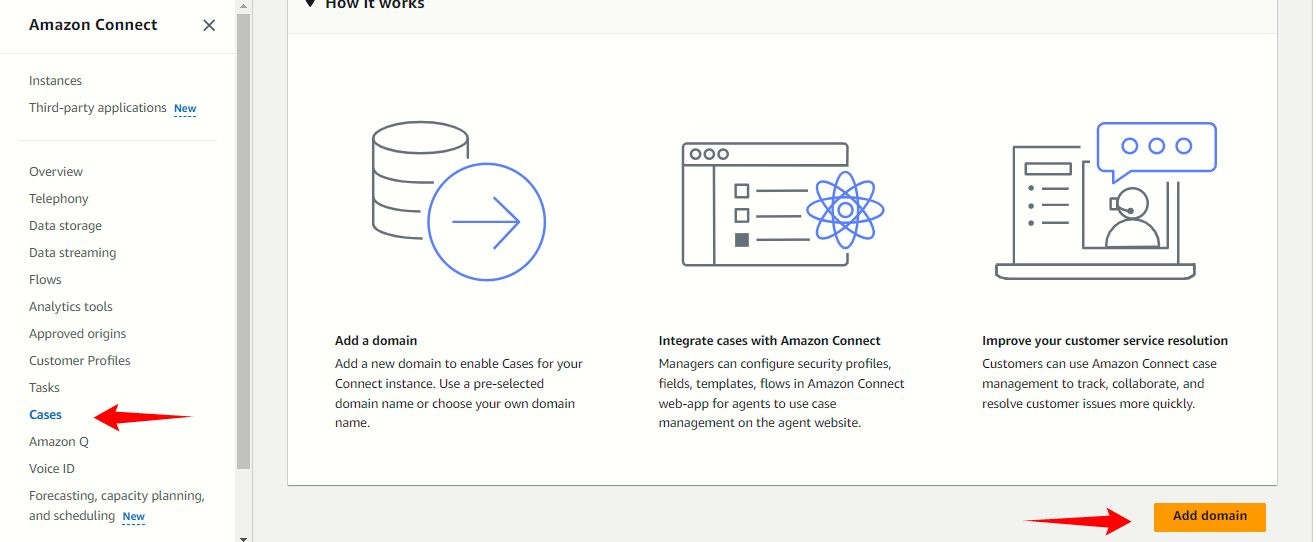
Case Domains are containers for all case data, including cases, fields, templates, and layouts. Each Amazon Connect instance can only be linked with a single Case domain.
- To create a Domain in AWS Connect, navigate to your AWS instance.
- Select your Domain and navigate to the cases. Click on “Add domain”.
- In the domain settings, click Create New Domain and input a distinctive domain name.
- Your domain has been created.
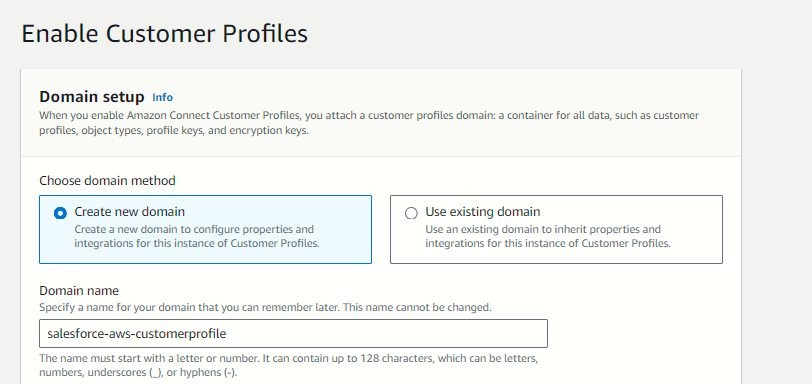
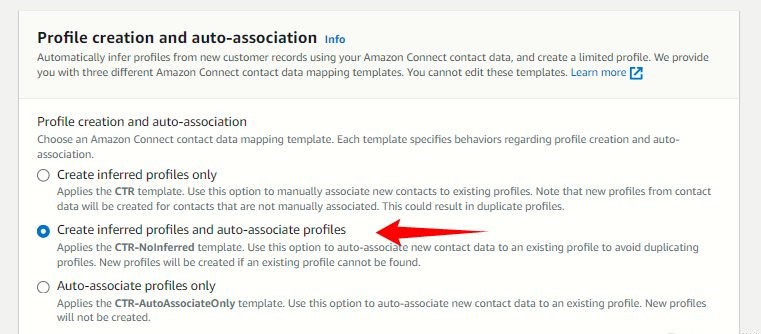
Customer Profile Domain
To create a customer profile, you must have to enable it by clicking on the enable button.
- In a domain setup select new domain and enter a unique domain name.
- Profile creation and auto-association: Click on inferred profiles and auto-associated profiles.
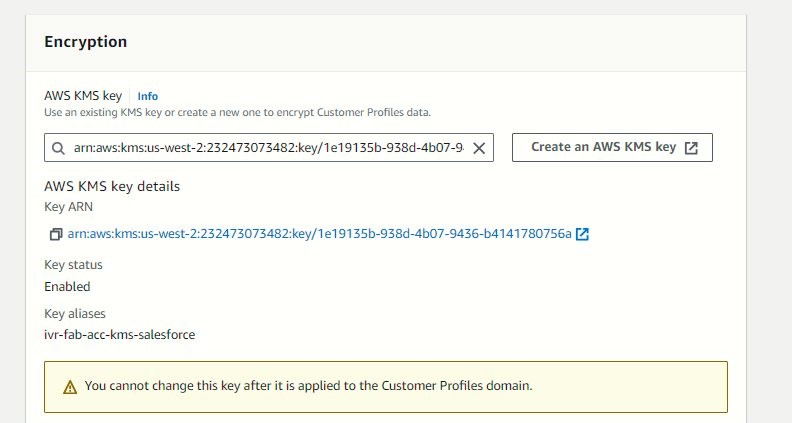
- Encryption: Select the kms key from the list. If kms key is not found, then create a new one. Then click on enable domain.
- Now, your Customer Profile Domain has been created.
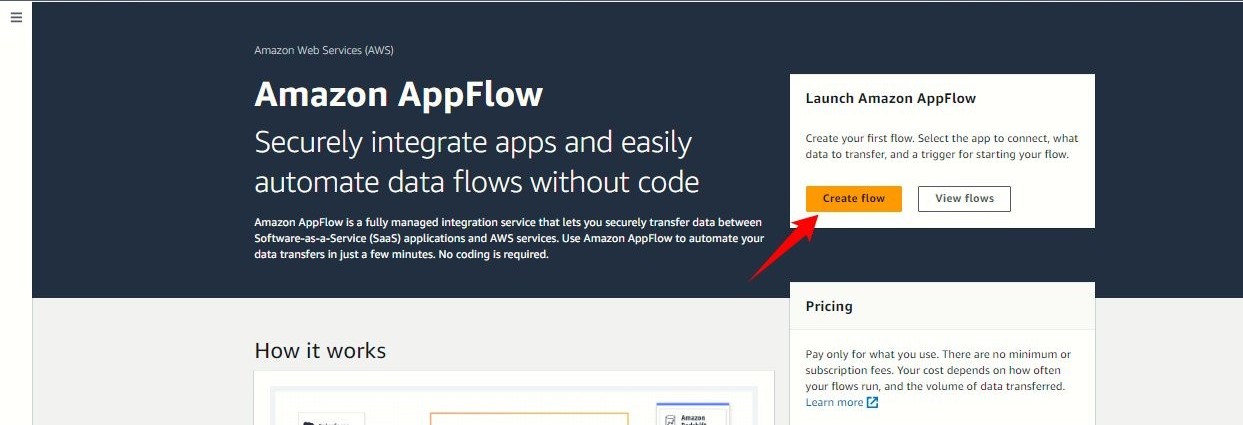
We’ve learned how to automate post-call operations with Lambda functions. But what about providing agents with real-time Salesforce case management right from AWS Agent Workspace? Here’s where AWS AppFlow comes in!
AppFlow serves as a data integration solution in AWS. In this instance, we’ll use AppFlow to easily sync case data between Salesforce and Amazon Connect. Agents may examine and handle relevant cases directly via the AWS Agent Workspace interface.
Let’s begin developing the app flow.
- First, choose Create Flow.
- Now set the KMS key details.
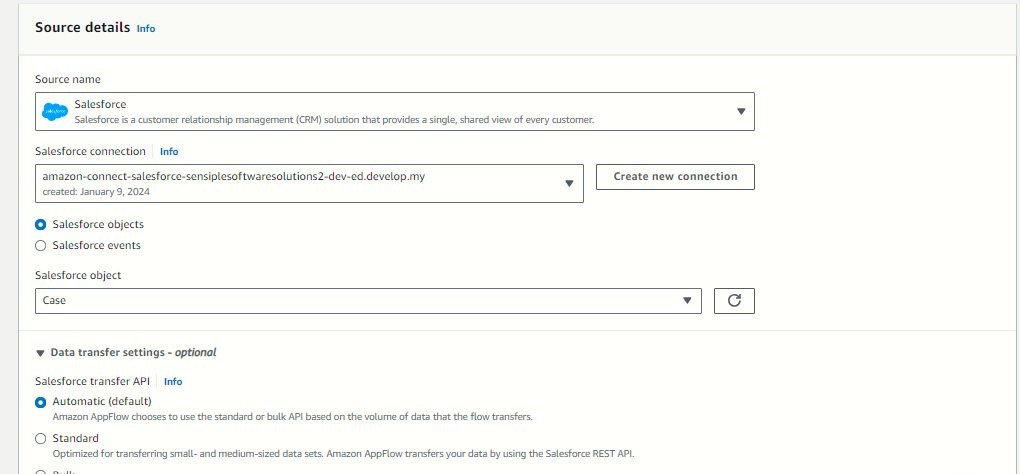
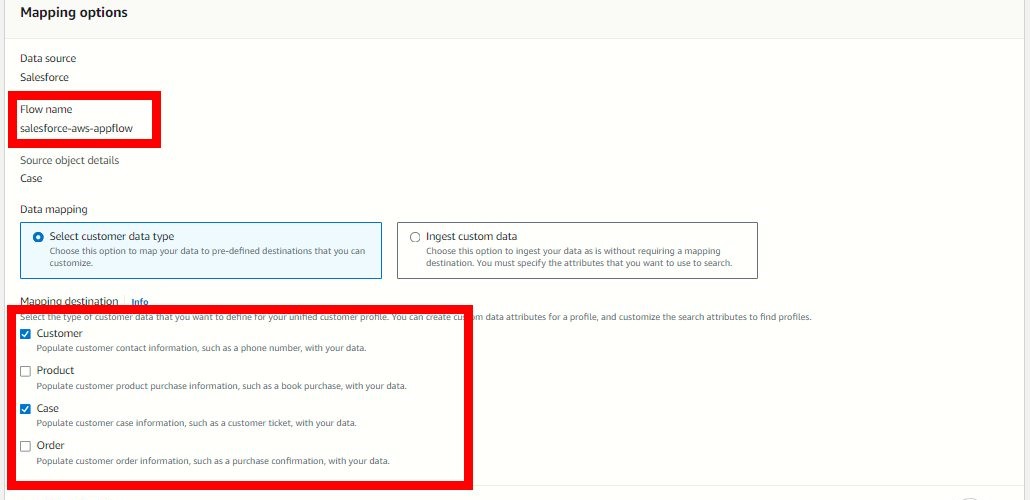
- Now Add the Source details. Here source should be mentioned as salesforce because we are collecting the salesforce data.
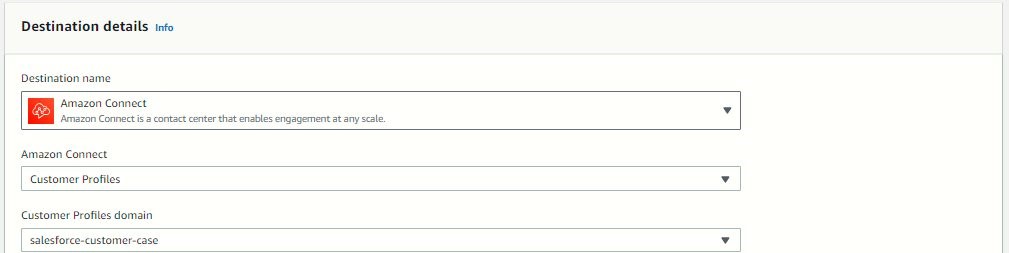
- Now select the Destination field. We must have to choose the Destination as Amazon Connect. Select the customer profile domain as we created in above.
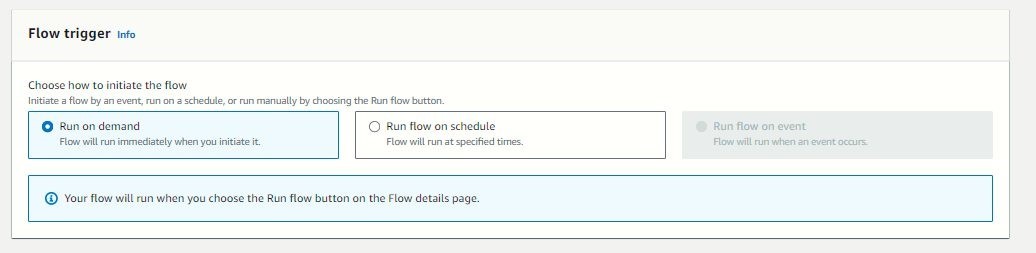
- Select the trigger method as Run on demand.
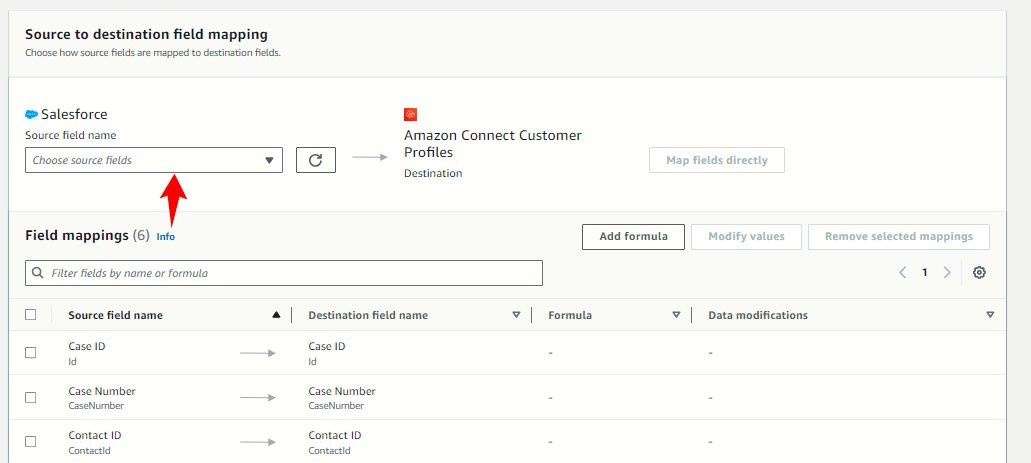
- In Source to destination field mapping, choose the fields which are required to show on agent workspace.
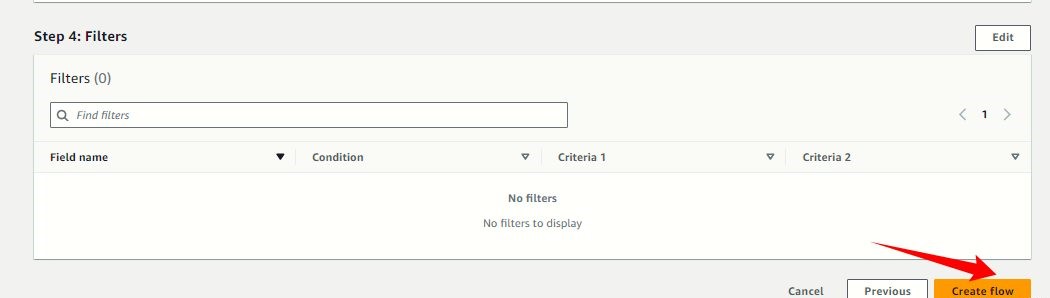
- Finally review it once, then click on Create flow.

Your APP flow to fetching case data has successfully created.
We investigated the magic of combining Salesforce with AWS Connect. We also saw how AWS AppFlow simplifies case management for agents. However, there is another layer to consider: establishing a single view of your consumer across all platforms.
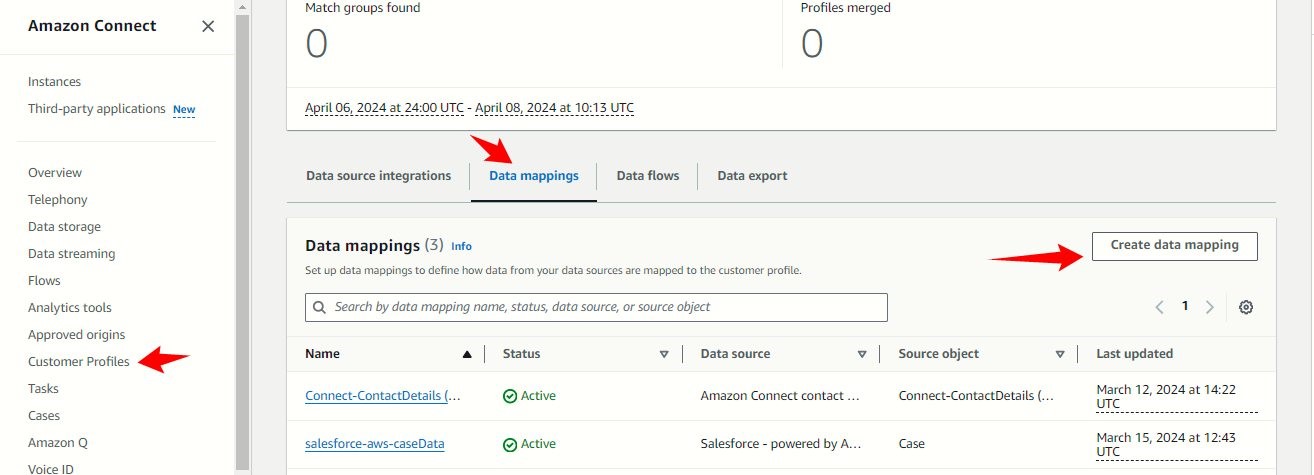
Here is where AWS Connect Customer Profiles come into play. It serves as a central repository for client data, taking information from Salesforce and your AWS Connect contact flow. By implementing data mapping, you can guarantee that information flows smoothly between various platforms, allowing your agents to provide great customer care.
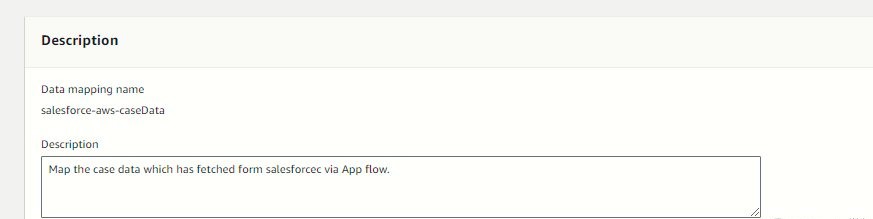
- First choose the Data Mappings.
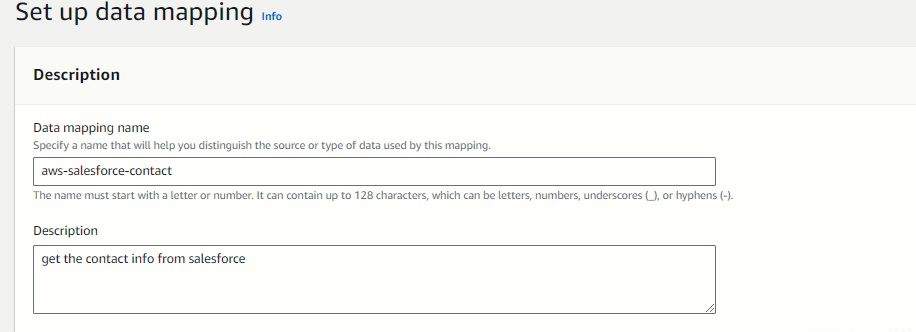
- Name a Mapping and add a description for it.
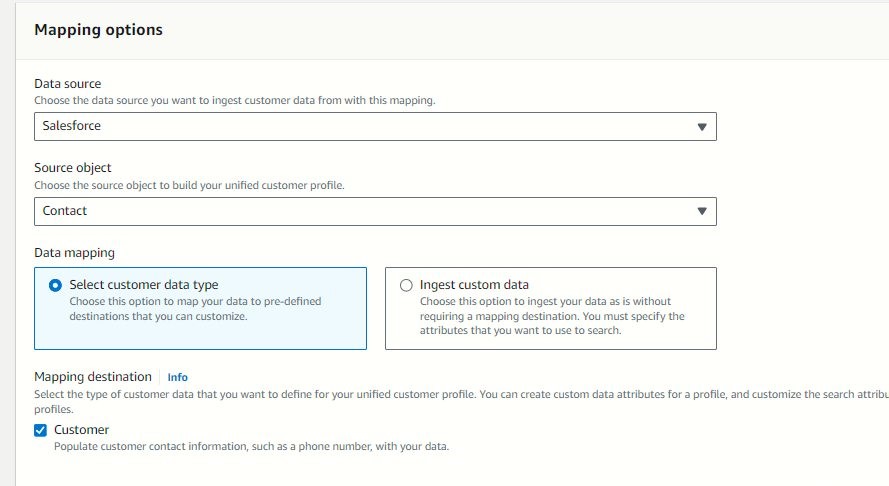
- Now select the Mapping data options.
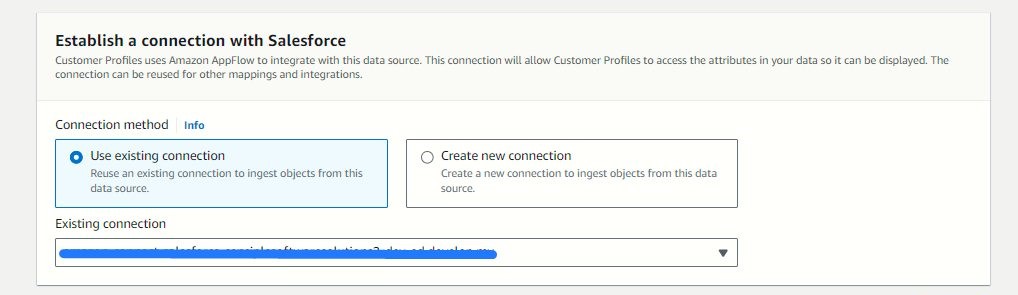
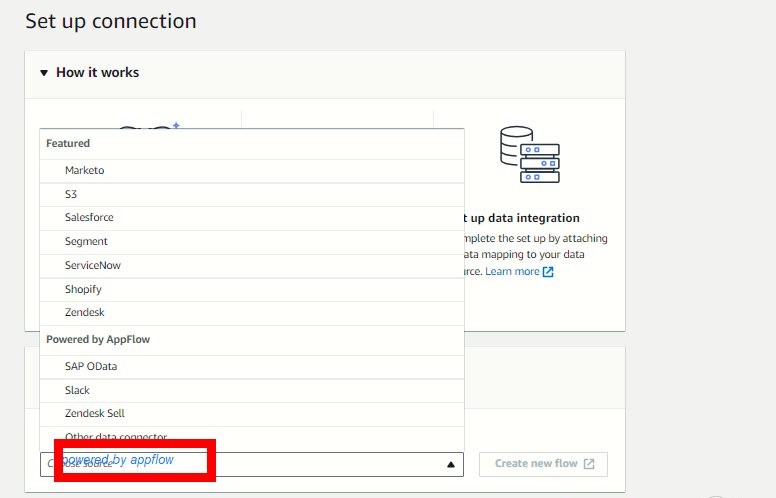
- Choose your salesforce connection if already exist else Create a new connection.
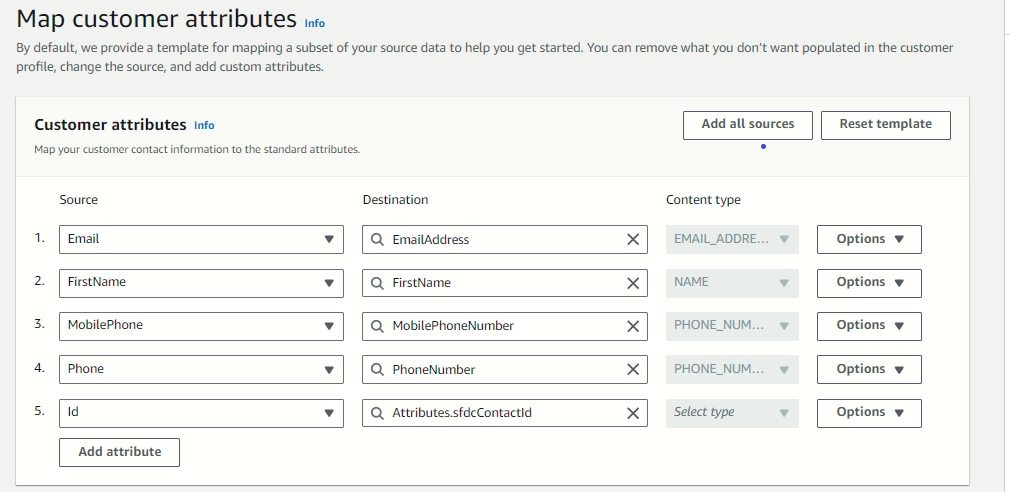
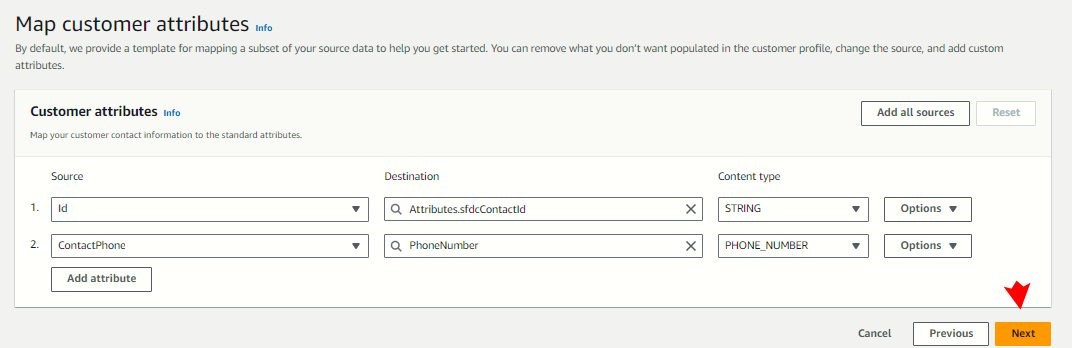
- Now Map these customer attributes field. Map the fields carefully because it will be reflecting on AWS Agent workspace.
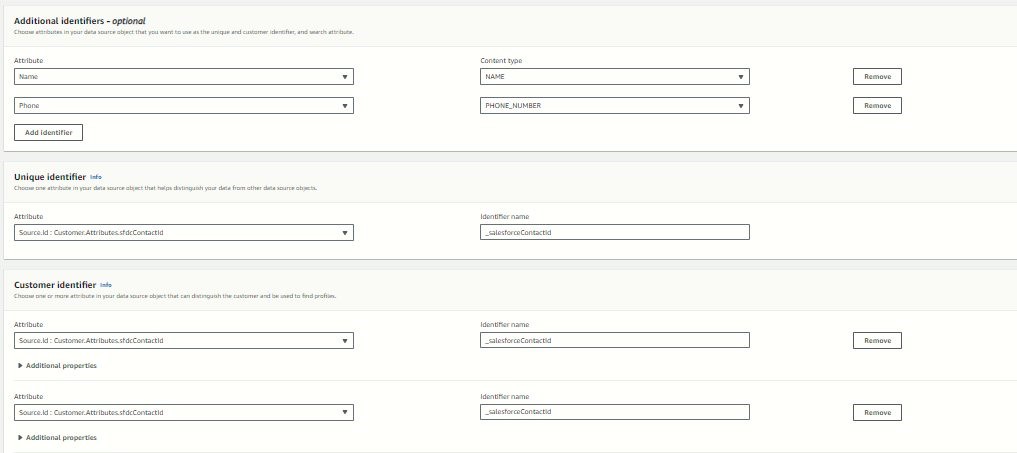
- Now fill up the identifiers.
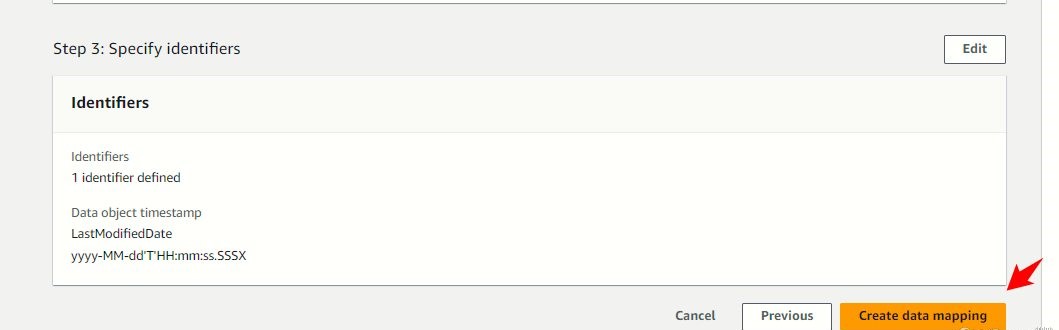
- Finally, once review it and save the data mapping.
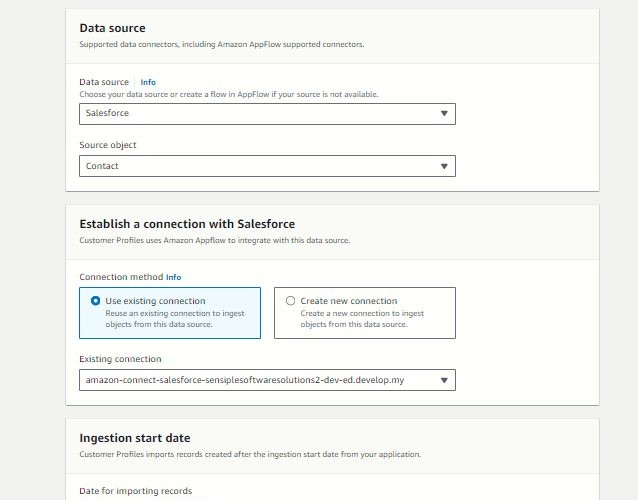
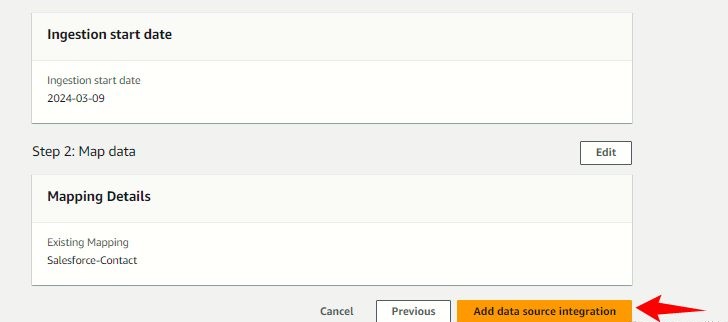
- After creating the data mapping now, we must have to create the Data Source integrations.
- Enter the Data source and Connection details.
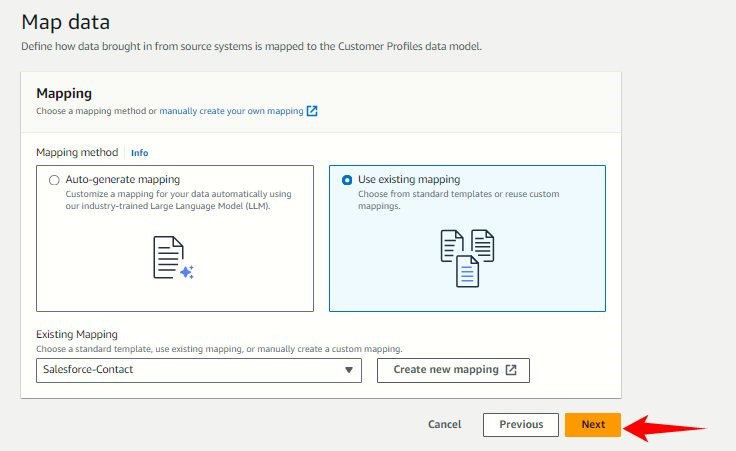
- Now select the Mapping method. We already created the mapping now just select the Created mapping name.
- Finally review and click on Add data source integration.
- Once the data source is created you can check in app flow that it created a flow in AWS app flow.
- Now we are done with customer data mapping part, Next we have to map for the case data.
- Again, do the same process, like click on the create data mapping. Name a mapping and add a Description for it.
- Select the Mapping option then click on Next.
- Select the Customer attributes as given below, if you have more data then choose those fields but necessarily Contact ID.
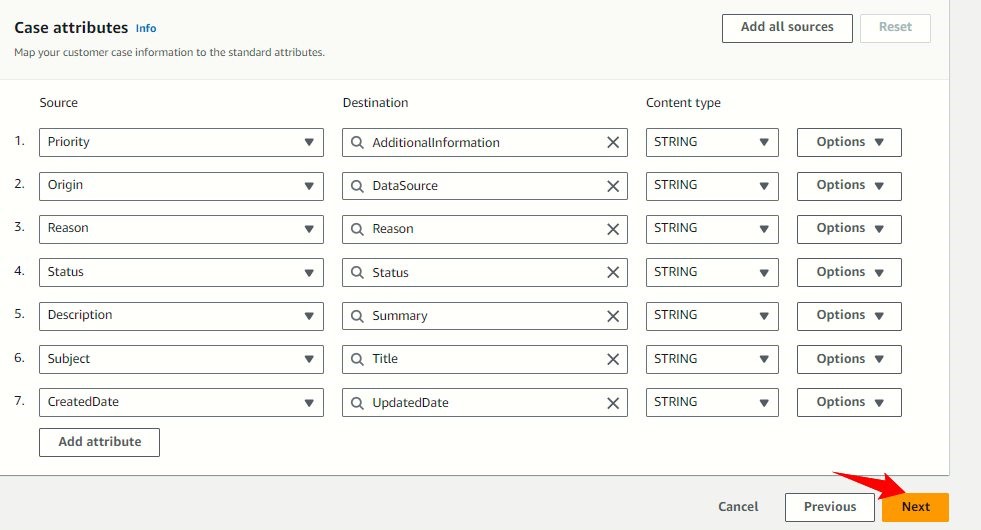
- Map the Case attributes then choose Next.
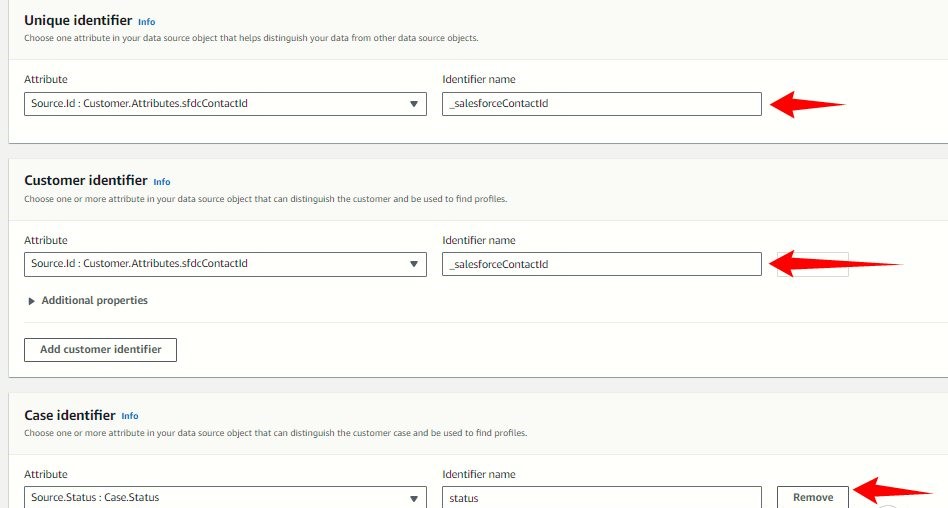
- Now add the identifiers as added in the figure and then click on Next.
- Finally, review them all and click on the add mapping data button.
- After the data mapping now integrate the source data. Choose the data source as powered by app flow – salesforce then click on the Next.
- Then select the Data Mapping i.e., we created click on add source integration.


Enhancing Customer Experience: Elevating Service through Identity Resolution
Throughout this blog series, we’ve discussed integrating Salesforce with AWS Connect and Agent Workspace, using AWS AppFlow for case management, and using AWS Connect Customer Profiles for customer data mapping. This has built a solid basis for a more efficient contact centre experience. However, one critical component remains identity resolution.
Why Identity Resolution is Crucial?
Consider a scenario in which a consumer calls your helpline twice in a short period. They may use their work phone number for the first call, and then their cell phone for the second. Despite being the same consumer, your systems may process these interactions differently due to the varied phone numbers. This fragmentation might result in a disconnected customer experience and prevent agents from acquiring a thorough understanding of the client’s interactions.
The Final 5%
Implementing identity resolution may appear to be a small step, yet it may greatly improve your client experience. Here is a summary of what allowing identity resolution entails:
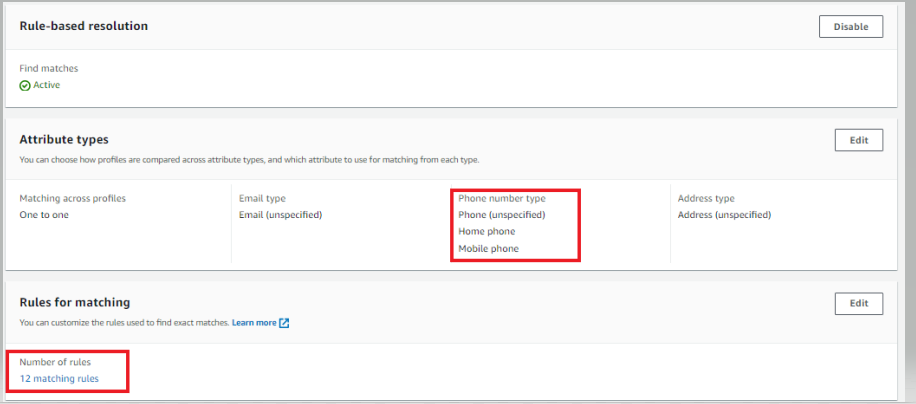
- Enabling the Feature:In the AWS Connect Customer Profiles panel, you will see an option to enable identity resolution. This initiates the use of built-in algorithms that work seamlessly behind the scenes.
- Defining Matching Criteria:Defining Matching Criteria: You may choose criteria for identification resolution, such as a phone number, an email address, or a combination of these. This allows the system to build better linkages between consumer experiences.
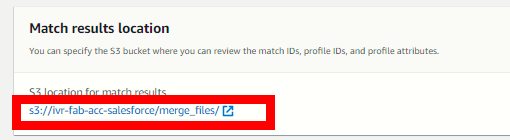
- There are a total of 12 rules for matching; select the one that best fits your data. I just want to verify with a cellphone number; thus, I’m using Rule 12. Select the Match result site.
- After completing all necessary setups, we can start the data flow with AWS AppFlow. We have reached the exciting conclusion of our blog series on integrating Salesforce with AWS Connect and Agent Workspace! Throughout this journey, we’ve experimented with several ways to provide a simplified and data-driven experience for both your agents and clients. Let’s examine how this applies to a real-world event.

As we wrap up our blog on integrating Salesforce with AWS Connect and Agent Workspace, we’ve explored numerous avenues to streamline and enhance the experience for both agents and clients. Now, let’s bring this concept to life with a real-world scenario.
Picture This: A customer reaches out to your helpline. The call seamlessly navigates through your AWS Connect contact flow, directing it to the appropriate agent. Here’s a glimpse into what the agent encounters when they receive such a call in their workspace.
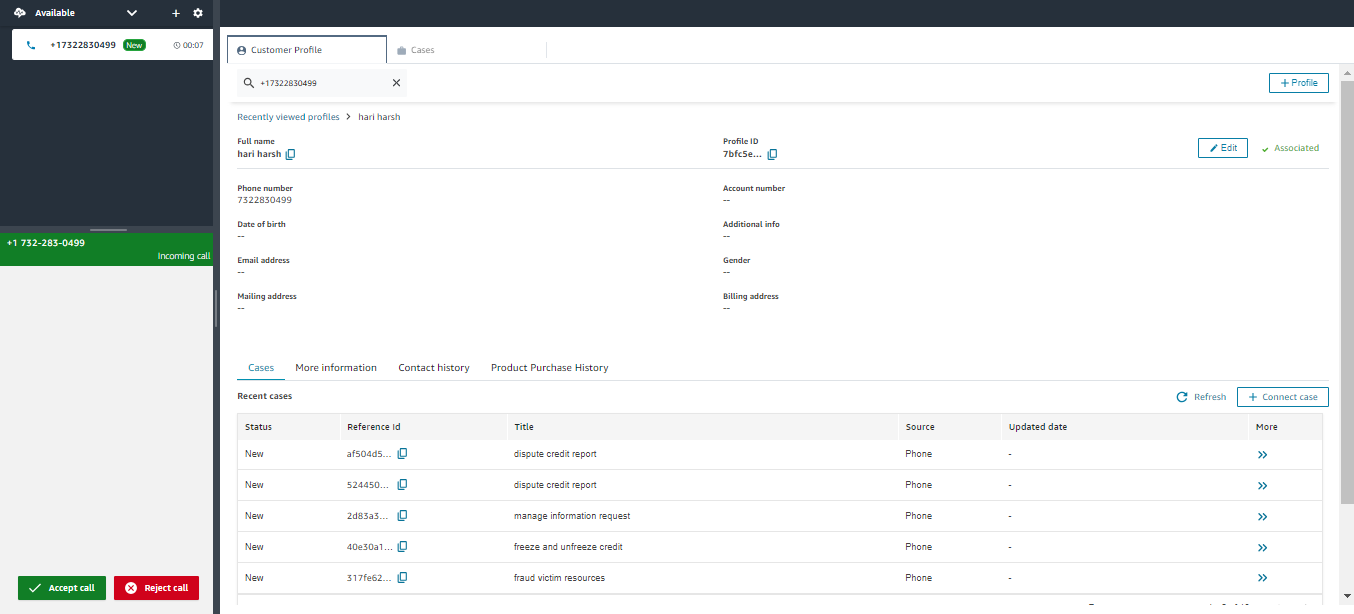
In summary, the integration of Salesforce with AWS Agent Workspace represents a monumental leap forward for customer service. This integration streamlines workflows and delivers holistic customer insights directly to the AWS dashboard, significantly boosting productivity while guaranteeing a seamless and delightful experience for your clients. No more cumbersome system-switching—embrace a smoother, more efficient approach to managing customer interactions. Embark on a journey with this innovative solution today and redefine your customer service experience!
About the Author:
 Harini Ravichandran, Backend Developer at Sensiple, has two years of expertise in IVR practice. She is proficient in Java and Node.js and has successfully managed a variety of tasks inside Nerve Framework, Lang Chain Framework, GCP, AWS, Open AI, and MongoDB.